DIY 3D Printing
The MAKEmory Community offers Do-It-Yourself 3D printing at the Computing Center at Cox Hall and the Woodruff Health Sciences Center Library. These instructions offer an explanation on how to access this equipment.
Please see this PDF to learn how to operate the Prusa 3D printers.
Students have up to 100 hours of free printing per month and may print on one 3D printer at a time. Users of our DIY 3D printers may submit print jobs of 6 hours duration or less. Users may submit print jobs with a duration up to six hours. Larger files and longer print jobs must be printed through TechLab's 3D printing service. All users of our 3D printers must adhere to our 3D Printing Terms of Use.
If you would like more information, TechLab offers workshops and training using this equipment.
- Create an Account
- Verify Printer Access
- Uploading a File
- Preparing a File
- Preparing a Printer
- Send a File to the Printer
- Remove A Print
Creating a 3DPrinterOS Account
This section covers creating an account with 3DPrinterOS. You will need an account in order to send a print job to any SDL managed 3D printer.
Step 01:
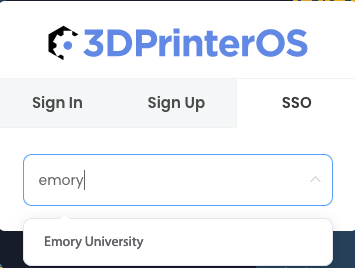
Go to https://www.3dprinteros.com/ and click "Sign In".
Step 02:
Choose the "SSO" tab from the login menu. In this tab, search for "Emory University".
Step 03:
You should receive a standard Emory Login Screen. Login as you would normally.
You have just created your account for 3DPrinterOS.
Please note that you may receive an email from 3DPrinterOS confirming your account creation. Any password provided is for when you leave the Emory ecosystem and wish to continue to use your 3DPrinterOS account outside of Emory.
Verifying Access to the Default Printers
Once you have your account, let's make sure you have the printers you need or want.
Find Your Available Printers
Step 01:
While logged in to 3DPrinterOS, choose the "Printers" tab.
Step 02:
By default, all Emory Users should have the three Computing Center printers available to them. These printers are C-Prusa-1, C-Prusa-2, and C-Prusa-3.
The first part of the name is the location of the printers, in this example, the Computing Center at Cox Hall. This will help you chose a printer in an area that is most accessible to you. The second part of the name is theprinter type. The number indicates which individual machine it is. Should you have a problem with a specific printer, this will help technicians identify which printer is malfunctioning and needs to be addressed.
Adding New Printers:
Printers are set up using Workgroups to help keep them organized. Workgroups are generally set up by the area they are located in. To add a new Workgroup, follow the steps below.
Step 01:
While logged in to 3DPrinterOS, choose the "Printers" tab.
Step 02:
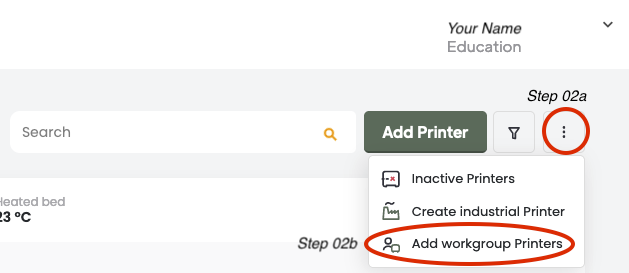
On the far left of the page, you will find an "Add Printer" button. Next to this button is a menu button with three vertical dots, otherwise known as a "kebab menu button". Click the kebab menu and choose "Add Workgroup Printers".
Step 03:
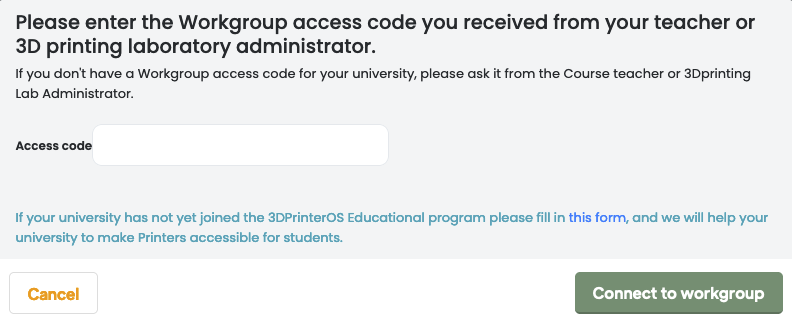
A window will appear asking you to input the Workgroup Access Code for the printers you are trying to access. The access codes are:
- Computing Center at Cox Hall: TLDIY
- The Hatchery: hatchery
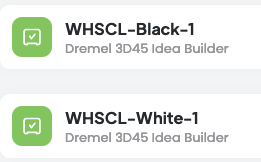
- Woodruff Health Sciences Center Library: WHSCL3D
Input your access code and click "Connect to Workgroup".
You should now have the new Workgroup of printers listed in your Printers tab.
Uploading a File to Print
This section covers creating preparing a file for printing with 3DPrinterOS.
Step 01:
While logged in to 3DPrinterOS, choose the "Files" tab. You will see sub-tabs for "Files" and "Projects". You can work with either of these, however the specific steps might differ slightly.
Step 02:
Click the "Add Files" button located on the far right if you just want to add a file. The ellipsis menu next to this button has a "Create Project" button if you are following these instructions under the Projects sub-tab.
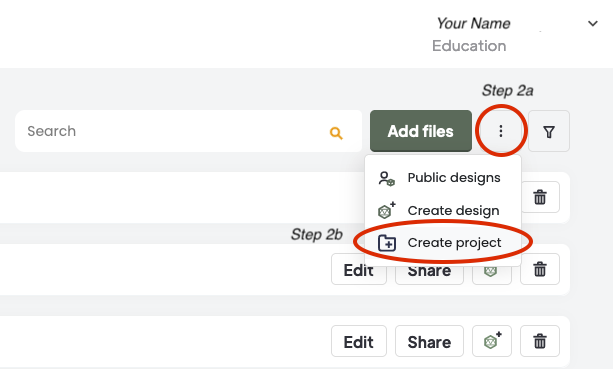
Step 03:
Using this new window, you can either drag and drop content into the window, or use the "select from computer" button to upload a file.
Once your file has finished uploading, you may prepare the file for printing.
Preparing a File to Print
Step 01:
Find the file you want to work with. One the far right you will find some buttons. Layout, Slice with a dropdown option, and an ellipsis menu.
Step 02:
Click "Layout" to go into the file editor for 3DPrinterOS. From here, first make sure that the proper printer has been selected. If you layout a file for the wrong printer type, you run the risk of malfunction.
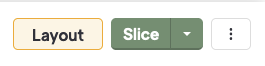
Example of Layout and Slice Button Above
In the Computing Center in Cox Hall and the Woodruff Health Sciences Library, the three printers available are Prusa MK4S model printers.
Step 03:
Once you have verified your printer, you can use the Move, Rotate, and Scale functions to manipulate your object. For many files, using the Move function to "Center" and "On Bed" is sufficient. If you do not place the object "On Bed", you run the risk of a malfunction.
If you have trouble doing this, make sure the file you want to manipulate is selected in the file editor. If you have added additional files, this is especially important.
Step 04:
When you are done laying out your object and you are content with its placement, on the top right of the window you will see "Slice".
Back to TopSlicing a File
If you started slicing directly from the Layout step, a Slicer window should automatically pop up. If you are attempting to Slice directly from the Files tab, you will need to use the Cloud Slicer option from the Slice drop-down menu.
Using 3DPrinterOS's "Prusa Slicer" to Slice a File for Prusa Printers
Step 01:
Expand the "Slice" button to the right of your file name.
Select "Slicer for Prusa" from the dropdown menu.
Step 02:
Verify the Select Printer Type dropdown is set for the printer you want to use. In Cox Hall and WHSCL, the printers available are Prusa MK4Ss.
Step 03:
We have taken the liberty to prepare a Slicing Profile for people to use if they so choose called "Prusa Printers". This profile is set with a .2mm layer height and 15% infill density. Users can adjust the layer height for increased or decreased resolution, modify the infill percentage, and enable or disable support materials.
This preset was tested by TechLab and we feel it works well for the Prusa MK4Ss available.
Some prints may need supports or additional adhesion methods when printing. There is a checkbox and drop-down menu for these respective settings. Choose them as is appropriate for your specific print.
If you are not sure your print needs these, feel free to speak with a TechLab staff member for suggestions.
If you do not want to use a preset, you can feel free to manipulate the sliders or text fields to set the settings you prefer.
You are now ready to send a file to the printer. But first we need to make sure the printer is ready.
Using PrusaSlicer to Slice a File
Users who are familiar with 3D printing may opt to use PrusaSlicer to prepare their print. 3DPrinterOS will accept gcode as an upload and be able to send it to the printer. Just make sure you slice for the correct hardware and once you upload you mark the gcode as compatible with the appropriate printer. Otherwise, you will not be able to finalize the upload and send to the printer.
For Prusa printers, select "Prusa MK4S with .4mm nozzle" (note, this is not the CHT nozzle).
Preparing a Printer
Checking Filament
Step 01:
Filament is stored in the printer on the left side of the machine, inside the printer itself. The filament runs up the back of the print area to the extruder. If you see filament running into the printer, that's great. If not, please seek out a staff member for assistance on replacing filament or fixing broken filament.
Step 02:
If there is filament running into the extruder, you may want to make sure that there is enough filament for your print. Look at the spool of filament on the side and use your best judgement to estimate the amount of material needed. The spool holds 500g of filament when new and unused. So approximately half a spool would be 250g, a quarter would be 125g, etc.
To check the size of your print, use the "Preview" button on your file and choose the "Info" tab. Weight is listed at the bottom in grams.
Prepare Print Surface
Step 01:
Ensure the removable flexible metal print sheet is in place and lays flat.Step 02:
Ensure the print sheet is completely clear and clean. Remove any left over plastic.
Check the "Intro Line" in the front left corner of the plate has been removed. This line is how the printer cleans the nozzle at the beginning of each print. Leaving this in place risks damaging your print.
Step 03:
This step is optional. Wipe down print sheet with an alcohol wipe. Alcohol wipes are in the Print Pickup box in Cox Hall.
Send a File to the Printer
You have now prepared a file and a printer and are ready to send a file to the printer.
Step 01:
While viewing the Files Tab on 3DPrinterOS, you will see a drop-down menu for "Print" on the far right side. If you click the drop-down arrow, you will be given the option to send your print to a specific printer. Only printers that are available will be visible.
Step 02:
Choose the the printer you wish to print your print on. Clicking this will begin your print.
Please note, you must be in-person at the printer to begin your print.
Remove a Print
Once a print is finished, we need to remove the print from the printer. Allow the printer to fully cool before performing this operation.
Step 01:
Open the printer and remove the build plate by lifting up the metal sheet at the front two corners.
Step 02:
Lightly twist and bend the metal plate. Your print should gently pull away from the print bed. You can pull away your print once it begins separating from the print bed.
Step 03:
If any of your print remains on the plate, use the plastic spatula to remove any remaining pieces.
MAKE SURE YOU DO NOT PUT YOUR HAND IN THE PATH OF THE SPATULA. YOU WILL CUT YOURSELF.